Visual Understanding
Blog # 3
Visualizing Understanding
Visualizing Understanding
My example for this principal is attached. I created two instructional guides for my students, The Posters create a visual way for my students to benefit from the six benefits of visualizations. The posters provide a method for my students to understand why they should be interested in the material. Present a visual method of learning for my visual learners. Promote comprehension by providing the initial ideas that my students can scaffold their learning upon. Promotes deeper understanding of the material I am teaching by showing them the thesis / principals of the material. Increases discipline specific / rote specific ideas in a visual way. I am presenting. posing these questions and also questions that they can ask will critiquing other works as well.
The Six Benefits of Visualization:
1. Increases engagement in learning process
2. Strategy of differentiation for diverse learning styles
3. Promotes comprehension via activating and building prior knowledge
4. Promotes deeper understanding & reasoning of content
5. Increased understanding of discipline-specific ways of visual representation
6. Tool for formative assessment
Visualizing Understanding:
Posters are one of my favorite visualization tools for use in the classroom. I use them in my teaching so often that I usually implement a poster into each of my lessons plans or at least each lesson that introduces a new technique to my students. I pretty much use them as a graphic organizer, something my students can refer back to when needed, which is why I usually create my own. Once I find a set of concepts that support my idea from online sources. I tweak those sources to conform to my lessons. Whether that be how I want my children to take specific steps or even just how it looks in relation to my unit lesson.
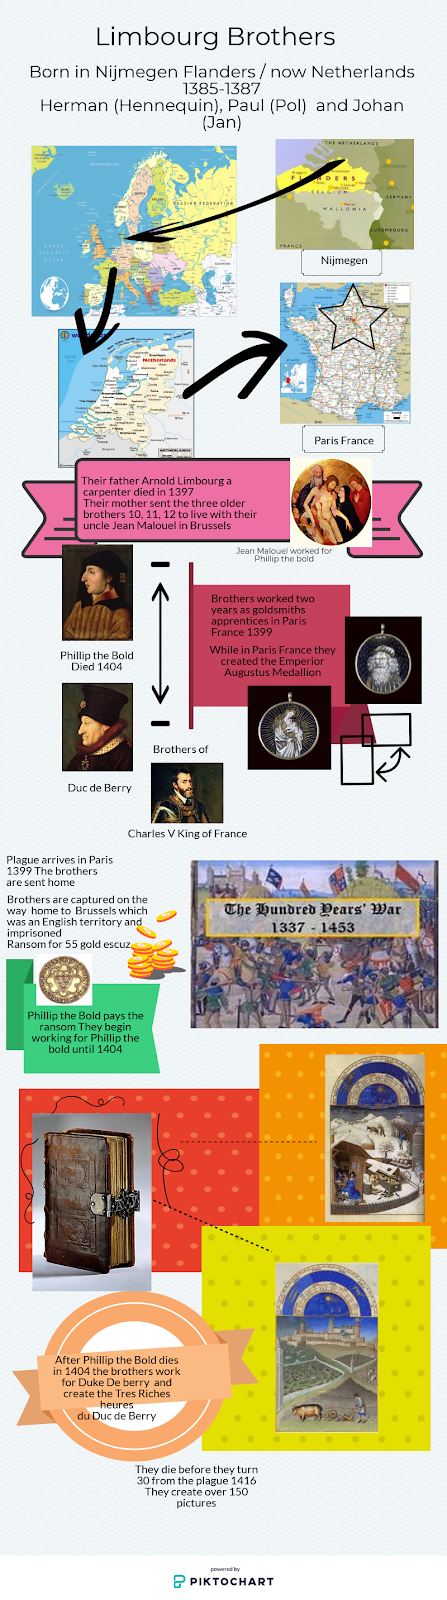
For the first poster I created a time line pertaining to the Limbourg brother’s lives. Instead of having my students search blindly without direction for information about the Limbourg brothers. I provided them with snippets of information that they could re-use to guide their own research into the Limbourg brothers. I know some of the sources they would find may be way above their reading comprehension level, so I went ahead and read and watched the information from many of the sources. I then created an introduction to the art lesson by creating a somewhat interactive, very colorful, attention grabbing visualization source so my students could clearly see what was being asked of them to learn and why. Like a rubric.
This is an introduction to early renaissance art, it could be used for any age group and really any art activity, because of this I had to think about all ages and grade in relation to the poster’s context. One big part of teaching art is relating to all or as many of the students that I can, either by artist, the process or even the context. When it came to style, I tried to make it as gender neutral as possible while still maintaining a cohesive lesson theme. You will also see fun text fonts and some hand drawn shapes to grab my student’s attention. I used a scrapbook like technique to create the first poster. My style choice was to be as clear as possible. By introducing the characters helps my students connect to the topic and is a really big attention grabber. The use of quote bubbles is another way to grab the student’s attention and get their attention on want I want them to learn about in art and the artist. When it comes to the heavy / discipline information, I used a lot of photos so the students could reference them to help aid with their comprehension.
By pre-answering the essential questions for the lesson, I have aided my students to understand what I wanted them to learn and why, it also gives my students a refresher during my follow-on lessons. If their interest to participate goes down or my students aren’t understanding what I am speaking about than all they need to do is look over to the poster for motivation or a clue to their question. By pre-answering the essential questions, I am following / completing Feldman’s Model handout, I am further aiding in my students understanding and comprehension. The poster aids in developing questions that enable students to describe, analyze, interpret, and evaluate art. We do this by using Open vs. Closed Questions, Follow-up Questions, and questions to deepen student understanding.
By having this content and big idea presented to my students in such a visual way, helps my students better understand the concept I am trying to and aids in their reading comprehension by the use of visual strategies that promote understanding through text, and imagery.
The second example is a drawing techniques poster which will save time for me as a teacher. The economy of time comes from my students who can review the drawing poster at will and I will not have to repeat demonstrations on drawing techniques. The time saved can be used for classroom management and the presentation of new or advanced materials. My students can review the concepts any time they feel the need and as many times as they want. Having the poster creates an interest in drawing in my students and provides my student with an initial introduction to more readings and written instructions. Those readings can challenge my students with new vocabulary may not be familiar with and with new art terminology.

Visualizing Understanding
My example for this principal is attached. I created two instructional guides for my students, The Posters create a visual way for my students to benefit from the six benefits of visualizations. The posters provide a method for my students to understand why they should be interested in the material. Present a visual method of learning for my visual learners. Promote comprehension by providing the initial ideas that my students can scaffold their learning upon. Promotes deeper understanding of the material I am teaching by showing them the thesis / principals of the material. Increases discipline specific / rote specific ideas in a visual way. I am presenting. posing these questions and also questions that they can ask will critiquing other works as well.
The Six Benefits of Visualization:
1. Increases engagement in learning process
2. Strategy of differentiation for diverse learning styles
3. Promotes comprehension via activating and building prior knowledge
4. Promotes deeper understanding & reasoning of content
5. Increased understanding of discipline-specific ways of visual representation
6. Tool for formative assessment
Visualizing Understanding:
Posters are one of my favorite visualization tools for use in the classroom. I use them in my teaching so often that I usually implement a poster into each of my lessons plans or at least each lesson that introduces a new technique to my students. I pretty much use them as a graphic organizer, something my students can refer back to when needed, which is why I usually create my own. Once I find a set of concepts that support my idea from online sources. I tweak those sources to conform to my lessons. Whether that be how I want my children to take specific steps or even just how it looks in relation to my unit lesson.
For the first poster I created a time line pertaining to the Limbourg brother’s lives. Instead of having my students search blindly without direction for information about the Limbourg brothers. I provided them with snippets of information that they could re-use to guide their own research into the Limbourg brothers. I know some of the sources they would find may be way above their reading comprehension level, so I went ahead and read and watched the information from many of the sources. I then created an introduction to the art lesson by creating a somewhat interactive, very colorful, attention grabbing visualization source so my students could clearly see what was being asked of them to learn and why. Like a rubric.
This is an introduction to early renaissance art, it could be used for any age group and really any art activity, because of this I had to think about all ages and grade in relation to the poster’s context. One big part of teaching art is relating to all or as many of the students that I can, either by artist, the process or even the context. When it came to style, I tried to make it as gender neutral as possible while still maintaining a cohesive lesson theme. You will also see fun text fonts and some hand drawn shapes to grab my student’s attention. I used a scrapbook like technique to create the first poster. My style choice was to be as clear as possible. By introducing the characters helps my students connect to the topic and is a really big attention grabber. The use of quote bubbles is another way to grab the student’s attention and get their attention on want I want them to learn about in art and the artist. When it comes to the heavy / discipline information, I used a lot of photos so the students could reference them to help aid with their comprehension.
By pre-answering the essential questions for the lesson, I have aided my students to understand what I wanted them to learn and why, it also gives my students a refresher during my follow-on lessons. If their interest to participate goes down or my students aren’t understanding what I am speaking about than all they need to do is look over to the poster for motivation or a clue to their question. By pre-answering the essential questions, I am following / completing Feldman’s Model handout, I am further aiding in my students understanding and comprehension. The poster aids in developing questions that enable students to describe, analyze, interpret, and evaluate art. We do this by using Open vs. Closed Questions, Follow-up Questions, and questions to deepen student understanding.
By having this content and big idea presented to my students in such a visual way, helps my students better understand the concept I am trying to and aids in their reading comprehension by the use of visual strategies that promote understanding through text, and imagery.

The second example is a drawing techniques poster which will save time for me as a teacher. The economy of time comes from my students who can review the drawing poster at will and I will not have to repeat demonstrations on drawing techniques. The time saved can be used for classroom management and the presentation of new or advanced materials. My students can review the concepts any time they feel the need and as many times as they want. Having the poster creates an interest in drawing in my students and provides my student with an initial introduction to more readings and written instructions. Those readings can challenge my students with new vocabulary may not be familiar with and with new art terminology.


Comments
Post a Comment